Hello! Hello! Happy Creative Life Scrapbooking PJ Party Day! Tammy here from Photo2Albums, I hope you are settled in for a fun evening of scrapbooking with us, we will be sharing a project with you every hour from 4:00PM EST to 1:00 AM EST on our Facebook Page! I am excited to share this CLS PJ Party project with you!
For this layout, I really wanted to focus on the photos, so I kept the photo layout simple, then added design by incorporating offset top and bottom borders to give it just the right amount of texture and visual balance. I’ve used the 12” Straight Trimmer and the new Gum Leaf Punch (I love the leaf design and this it is perfect for these photos taken from my trip to Manitoba, Canada!), and don’t forget the Multipurpose Tool and Repositionable Adhesive. All supplies are from the Genuine Collection.

STEP 1 – Base Layout
- Photos: Three 4” x 4”, five 4” x 5.5”
- Use two sheets of the light leaf pattern designer paper as the backdrop.
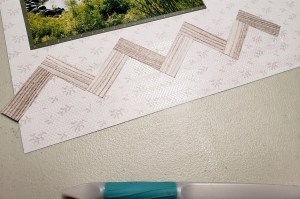
STEP 2 – Chevron Border
- Use the wood grain designer paper, cut two 1.5” x 12” strips, then cut each strip into ½” x 1.5” strips to create a wood plank look.
- Run Repositionable Adhesive over the top 3” of the left side paper and bottom 3” of the right side of the layout (don’t run where you will be placing the photos on the left and the border on the right)
- Start at one edge of the paper and adhere the first ‘wood’ strip on an angle, add the second strip starting at the edge of that strip on an angle going in the opposite direction, continue with this pattern across the page. Add a second layer, then a third or forth if you like! (sample shows two layers). Use the Multipurpose Tool to adjust placement as needed
- Repeat for the opposite page.

Step 3 – Layout
- Cut one sheet of light green designer paper to 6” x 12” and adhere to the far-right side of the layout, then cut two ½” x 12” strips to adhere under the row of 4” x 4” photos on the left side of the layout
- Use two sheets of the dark green designer paper to cut five (5) 4.25” x 5.75” photo mats, mat 5 photos (or you can cut one or two 4.25” x 5.75” mats from the remaining light green to save cutting into a second sheet of the dark green). Use the Gum Leaf Punch to punch a few leaves, reverse the paper so the leaves go in different directions.

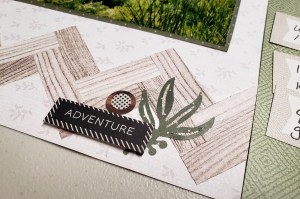
Step 3 – Embellish
- Use the banner Variety Mat and cut into 4 banners
- Add ABC/123 Stickers to one banner to use as the title, adhere to layout with Foam Squares tucking a Gum Leaf Punch under one side.
- Add journaling to each of the banners and arrange on the right side of the layout, stacking and staggering on top of each other, tucking a Gum Leaf Punch between.
- Add stickers and more Gum Leaf Punches as desired using Foam Squares to add dimension.
So, what do you think? Can you imagine creating a border like this with different papers? Can you see how adding texture to a simple layout adds to the overall design?
Happy, Happy Scrapbooking!
Tammy
Thank you for supporting my affiliate programs:
Creative Memories
FOREVER
Cricut
Shutterfly
Etsy
